How do you protect your observatory?
Having a dome is fantastic. If the weather is good, you simply open it up, start the equipment and begin imaging. No lugging heavy mounts around, no risk of dropping that telescope, and – best of all – no polar aligning!
But even if you’ve got a dome in your back yard, you’re probably not going to sleep well when it’s open. It’s more likely you’ll be tossing and turning in bed. You’ll be worrying that the weather is going to turn and it’ll cloud over. Worse, what if an unexpected rain shower ruins your expensive equipment? Has your neighbour installed a timed sprinkler system?
It’s even worse if you’re running a remote dome, which could be hundreds of kilometres away. Now, there’s no way you can sprint out to shut the dome, even if you know there’s rain coming.
There’s a gadget for that
To allow you a good night’s sleep, you can get a couple of sensors and monitors that will look out for unsafe conditions and tell your dome computer to take action to protect your observatory.
A CloudWatcher is a small weatherproof box with a number of sensors built in. These measure rain, light levels, sky temperature (which indicates the presence or absence of clouds) and humidity. There is also a version with a separate Hydreon rain sensor that looks like a small glass dome.
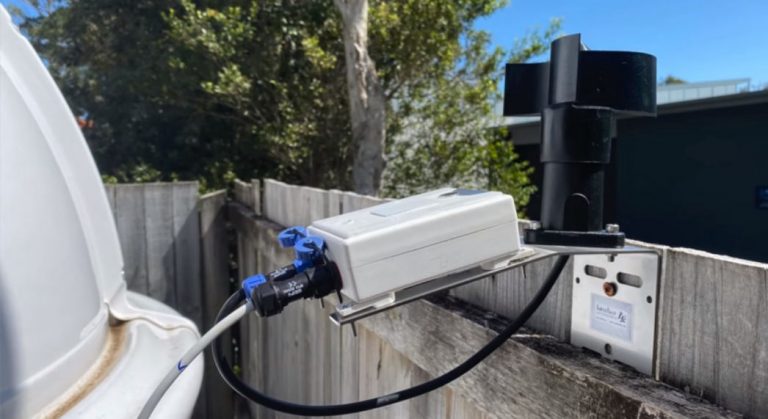
An anemometer measures wind speed, and this is cabled to the CloudWatcher. The anemometer looks like a paddle wheel which spins when the wind blows.
These sensors live outside, of course, and you can put them on a fence post (as Dylan has done here) or a pole, or you can even put them on the side of a building nearby.
How do they protect your observatory?
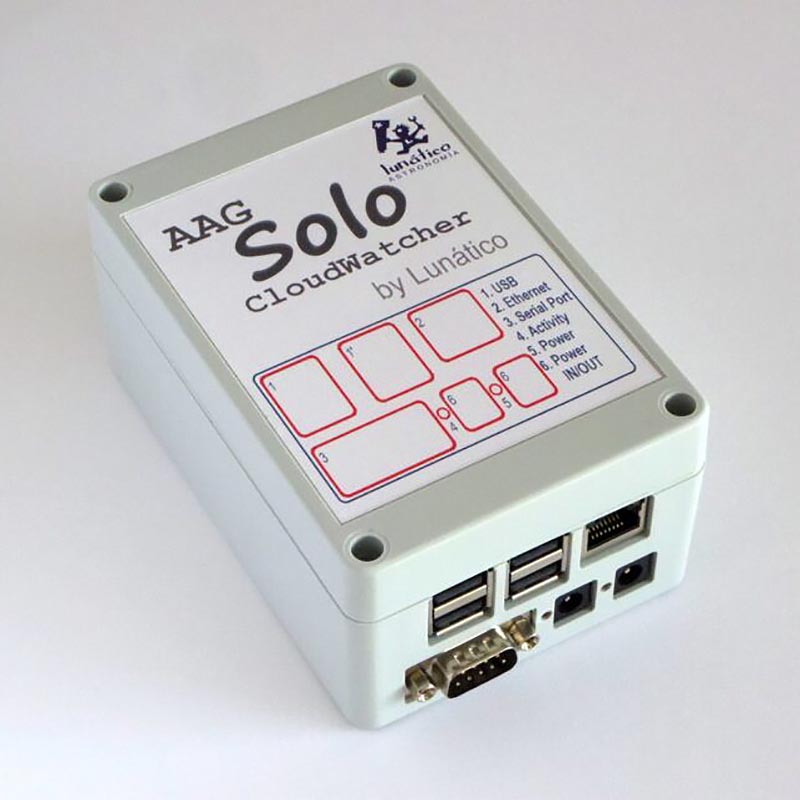
The sensors continually monitor the environment, assessing the various aspects. They’re connected to a tiny computer called a CloudWatcher Solo, and their results are stored there. The Solo stays on all the time and is connected to the Internet. You can check the conditions around your dome from anywhere in the world.
Your dome’s computer does the same, meaning it won’t open the dome if it’s unsafe to do so. It’ll close the dome if conditions deteriorate during an imaging session to protect your observaotry. You don’t have to be looking out of your bedroom window all the time.
What do you need (network cables, power)
The CloudWatcher and the anemometer need to be outside, although it’s not necessary for it to be adjacent to the dome. You can put them on a vertical pole, which can be on the ground, on a fence post, or on the side of a nearby building. The CloudWatcher gets any power it needs through the serial cable it uses to communicate.
You connect the anemometer to the CloudWatcher via a short cable with weatherproof connectors. In turn, you connect the CloudWatcher to the Solo with a longer serial cable.
This cable needs to be fairly long because the Solo is not weatherproof and has to stay inside (either inside the dome or a nearby building, see below).
The Solo has an SSD which is able to be added as a drive to your network, and the environmental data from the sensors is stored on this drive. When in operation, the main computer in the dome reads this file regularly to check environmental conditions and take whatever action is necessary.
Obviously, the Solo needs electricity and a network connection.
Three scenarios to protect your observatory
Because safety equipment has many options, there are many ways to set it all up. I’ll go into just three common options here.
Solo inside the dome
The most common way of setting up is to have the CloudWatcher and anemometer on a post near the dome. The serial (red in the diagram) cable runs from CloudWatcher to the Solo in the dome. Inside, you connect the Solo to the same network as the imaging computer. (The Ethernet cable is blue in the diagram.) You can check conditions through the Internet using your phone or home computer, because the Solo has its own web page. This is particularly good because the dome computer doesn’t need to be on.
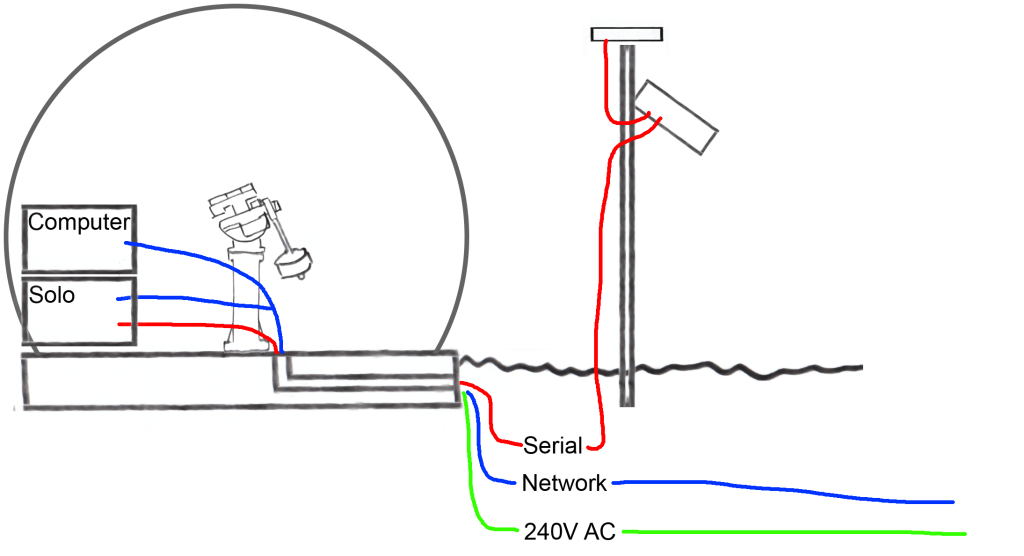
Once you have determined the weather conditions are safe, you can turn on the computer, dome, camera, etc. remotely and start your session. A remote switch such as a Dragonfly or similar is great for this.
Many domes (such as a 3-metre ScopeDome) rotate right to the ground. You can’t make a hole in the wall. If you have this type of dome, and it’s on a concrete pad, you will probably have to pass the cables through a conduit.
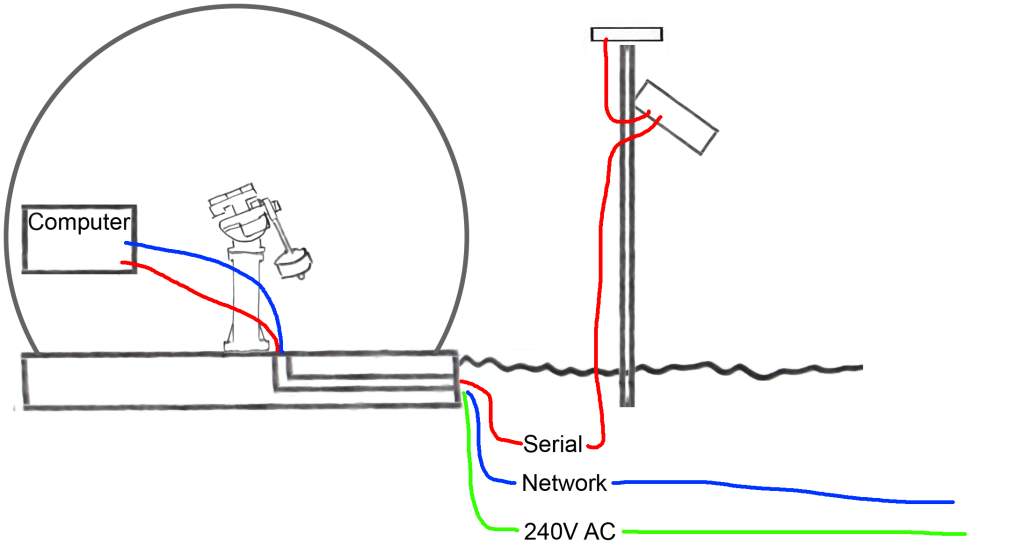
Computer only
This time, you connect the CloudWatcher directly to the imaging computer using a serial to USB adapter. In this scenario, there is no Solo.
We actually don’t recommended you set up the system up like this because it needs the computer to be on all the time. Also, because there is no web interface, you’ll find it clumsy to interrogate the computer to determine the weather conditions.
Solo in a nearby building
This layout works well if your dome is in the back yard of your house. It’s also the appropriate way to set up in a multi-building area such as a school. You set up the pole on the side of a nearby building, and put the Solo inside. The serial cable between the CloudWatcher and the Solo goes through the wall. Once you connect the Solo to the same network as the dome computer you can see it as a drive on that network. This drive contains the environmental data as produced by the CloudWatcher.
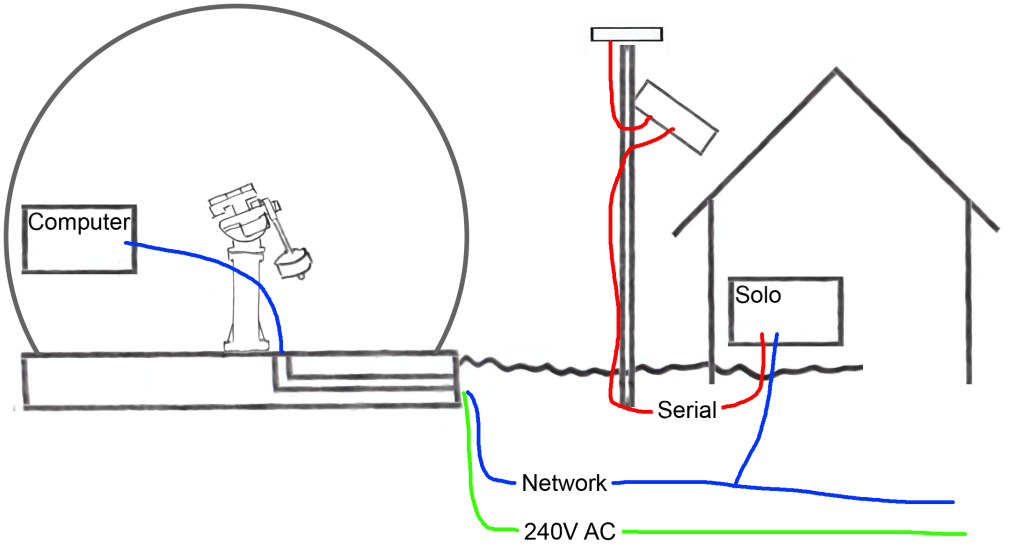
The operation of the system is the same as the Solo-in-the-dome option.
So you can sleep
No matter how you set up the system, your imaging computer will keep an eye on the environment. Having warning of clouds, wind or rain coming will protect your observatory. In the morning you’ll find the dome safely closed (as it’s become too light for imaging). All you have to do is download and process your images. Your task during the night is to get a good night’s sleep!